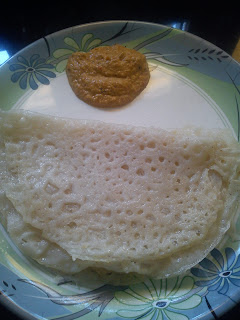
Well the name Neer dosa is very popular, not only the name but even its taste... but making it some people think is really difficult but its quite easy.. all you need is the right consistency of the batter and most important thing, people at home to eat it quickly, as soon as its served...
I did my part of research before making it, and i wanted it to be right since it was the 1st time I would be attempting it.. I decided to make it over the weekend when my in laws came so that i could at least have people at home to enjoy with..
A few important points to note: There's absolutely no need to ferment this batter.. Some people say that dosa's needs to be made immediately after grinding, while some are of the view that it can be kept for about 30-45 minutes.. Some people according to their convenience make the batter and store it the fridge overnight.
One more point is about using the right kind of tava. I did borrow my mom's old tava (the one that people in Mangalore originally use to make such dosas) but my dosa never turned up using it, in fact the non-stick tava worked wonders for me.. All the dosas came out wonderfully without even sticking once.. But make sure the tava is not too hot (the dosa might turn crispy) nor too cold (dosa might not cook evenly). Maintain the flame venly once the tava is heated up..
Preparation time: 20 minutes
Cooking time: 3-5 minutes per each dosa
Serves: 5 (3 dosas each)
Ingredients:
1. Raw rice (i took the rice i use daily at home) 3 cups
2. Fresh grated coconut 1/2 cup
3. Salt to taste
4. Water
Method:
1. Soak the rice for about 3-4 hours (i soaked it overnight coz i was making it for breakfast)
2. Grind the rice along with grated coconut to fine paste.
3. Add salt and adjust the consistency of the batter to very watery state.. It should be really watery unlike the normal dosa bater.


4. Heat the tava fully and pour about 1.5 spoon ful of the batter and rotate the tava with your hands, dont spread the batter with the spoon like its done for normal dosa.
5. Spread oil and cook with lid covered till its done on both sides.
6. Serve hot immediately with spicy coconut chutney or tomato chutney. I served with onion and tomato chutney
I did my part of research before making it, and i wanted it to be right since it was the 1st time I would be attempting it.. I decided to make it over the weekend when my in laws came so that i could at least have people at home to enjoy with..
A few important points to note: There's absolutely no need to ferment this batter.. Some people say that dosa's needs to be made immediately after grinding, while some are of the view that it can be kept for about 30-45 minutes.. Some people according to their convenience make the batter and store it the fridge overnight.
One more point is about using the right kind of tava. I did borrow my mom's old tava (the one that people in Mangalore originally use to make such dosas) but my dosa never turned up using it, in fact the non-stick tava worked wonders for me.. All the dosas came out wonderfully without even sticking once.. But make sure the tava is not too hot (the dosa might turn crispy) nor too cold (dosa might not cook evenly). Maintain the flame venly once the tava is heated up..
Preparation time: 20 minutes
Cooking time: 3-5 minutes per each dosa
Serves: 5 (3 dosas each)
Ingredients:
1. Raw rice (i took the rice i use daily at home) 3 cups
2. Fresh grated coconut 1/2 cup
3. Salt to taste
4. Water
Method:
1. Soak the rice for about 3-4 hours (i soaked it overnight coz i was making it for breakfast)
2. Grind the rice along with grated coconut to fine paste.
3. Add salt and adjust the consistency of the batter to very watery state.. It should be really watery unlike the normal dosa bater.


4. Heat the tava fully and pour about 1.5 spoon ful of the batter and rotate the tava with your hands, dont spread the batter with the spoon like its done for normal dosa.
5. Spread oil and cook with lid covered till its done on both sides.
6. Serve hot immediately with spicy coconut chutney or tomato chutney. I served with onion and tomato chutney


No comments:
Post a Comment