Thursday, 7 March 2013

Alu palak majjige huli

Majjige huli is a traditional dish, a kind of sambar made without toor dal. Sour curds are used to get the sour tangy taste. It can be made using pumpkin and greens. More popular version is made using pumpkins or mangalore cucumber.

I once had this really different majjige  huli made from potato and palak (spinach). It tasted really good and the combination was awesome. I had been planning to make it at home since the day i had it, but somehow the time had not come.. One fine day when i almost ran out of veggies stock in my fridge, except potatoes i remembered i had to try this. I got a bunch of fresh palak leaves after dropping my son at school.

Preparation time: 10 minutes
Cooking time: 20 minutes
Serves: 4


Ingredients: 

1. Potatoes 4-5
2. Palak leaves a bunch
3. Grated fresh coconut 1/2 cup
4. Jeera seeds 1tbsp
5. Ginger a little
6. Salt
7. Oil
8. Turmeric 1/2tsp
9. Coriander leaves a little
10. Green chillies 8-10 (depending upon their hotness)
11. Mustard seeds 1tsp
12. Dry red chillies 2nos
13. Chana dal 1.5 tbsp
14. Rice 1/2tbsp
15. Water
16. Sour curds 1 cup

Method:

1. Wash the palak thoroughly, chop them and keep aside. Cut the potatoes into cubes.
2. Soak the chana dal and rice for about 1/2 hour.
3. Cook the potatoes first, when half done add the palak (palak cooks early)
4. Grind coconut with ginger, green chillies, jeera seeds, coriander leaves, soaked chana dal, rice and turmeric powder to a fine paste. Make sure its not too watery.
5. Add this to the cooked alu and palak. Mix well.
6. Add salt and let it cook for about 3-4 minutes.
7. Now add the sour curds, and a little water if its too thick, mix well.
8. Let it cook for about 4-5 minutes on low flame.
9. Make seasoning of mustard seeds and dry red chillies.
10. Serve hot with rice.. Tastes best when had with puliogare.




Stuffed brinjal (Badanekyi tumbugayi)

Making stuffed brinjals for chapathi is definitely a weekend plan or something for the night dinner, when people at home can relish it with more time and for those who cook it as well. It's a little lengthier process, but the result is a yummy dish.

Preparation time: 30 minutes
Cooking time: 30 minutes
Serves: 4

Ingredients: 

1. 3/4kg of purple brinjals (small ones)
2. Mustard seeds 1tsp
3. Jeera seeds 1tsp
4. Poppy seeds 1/2tsp
5. Dry grated coconut 1/2 cup
6. Dry red chillies (guntur and byadagi) 5 each
7. Pepper corns 5-6
8. Methi seeds 1/4tsp
9. Chana dal 1tsp
10. urad dal 1tsp
11. Dhania seeds 1.5tsp
12. Water
13. Salt
14. Oil
15. Tamarind about a lemon's size


Method: 

1. Wash the brinjals and cut their crown, slit them into 4 (not fully)
2. In a kadhai heat 1tsp of oil and roast methi seeds, pepper corns, poppy seeds, chana dal, urad dal, jeera sseds and dhania seeds. Also the dry red chillies.
3. Grind them with dry grated coconut to a powder (don't add water)
4. Now fill some of this powder into the slit brinjals.
5. Heat about 4tbsp of oil in a kadhai and make seasoning of mustard seeds.
6. Add the stuffed brinjals, a liitle water, cover and cook till they turn tender.
7. Then add the ground powder, salt and squeeze the tamarind juice.
8. Mix well, add some more of the powder, water to required consistency and cook for about 4-5 minutes on low flame.

You can substitute groundnut powder in place of poppy seeds, taste will however differ a little.

9. Serve hot with chapathi/jolada rotti.


Wednesday, 6 March 2013

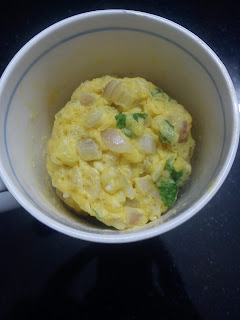
5 minute omelette in a coffee mug

We're pure vegetarians by birth, but as a kid my mom made sure i got the necessary proteins.. So she made sure that i had eggs almost daily, she would not cook it for me, but i used to go this creche managed by Christians, who even owned a bakery.. so it was my mom's standing instructions to give me an omelette almost daily. So that's how i got used to eating eggs, and I loved the omelette that aunty at my creche made.. i still remember that aroma, i would gulp it down in moments.. but i did not like boiled egg much..

So when it came to giving my son the proteins required, i did cook him omelette's and boiled eggs myself.. to my surprise my hubby made the best omelette for me during pregnancy, very similar to the one i used to have at the creche, so i did learn a bit from him..

It was a rainy evening and i was really hungry, had some eggs in the fridge which i had got for baking eggs, but used them for this.. I wanted to make bread omelette, ended up making just omelette.. my son enjoyed with lots of tomato sauce.. :)

I follow this food community called Etable, on whose blog i saw making omelette's in a coffee mug and that too in five minutes flat.. I had to try this... 

Preparation time: 3 minutes
Cooking time: 2 minutes
Serves: 1

Ingredients: 

1. Eggs 1nos
2. Onions 1nos
3. Green chillies 1 finely chopped
4. Salt to taste
5. Maida 1.5tsp
6. Oil/butter 1tbsp
7. Coriander leaves a little

Method: 

1. Break the eggs and beat it well. 
2. Add onions, green chillies, salt, oil, coriander leaves and maida and mix well so that no lumps are formed. 
3. Pour them into a microwave sup coffee mug, fill only half of the mug. 


4. Put in the oven at high power for about 1 to 1.5 minutes (or till its done). 
5. The omelette will rise up in between, but dont fret once its out of the oven it goes down. 
6. Check for doneness and let it stand for about 30 seconds in the oven. 
7. Serve hot.. 

You can any veggies to make it more healthy, or even add cheese to it. 


Omelette

We're pure vegetarians by birth, but as a kid my mom made sure i got the necessary proteins.. So she made sure that i had eggs almost daily, she would not cook it for me, but i used to go this creche managed by Christians, who even owned a bakery.. so it was my mom's standing instructions to give me an omelette almost daily. So that's how i got used to eating eggs, and I loved the omelette that aunty at my creche made.. i still remember that aroma, i would gulp it down in moments.. but i did not like boiled egg much..

So when it came to giving my son the proteins required, i did cook him omelette's and boiled eggs myself.. to my surprise my hubby made the best omelette for me during pregnancy, very similar to the one i used to have at the creche, so i did learn a bit from him..

It was a rainy evening and i was really hungry, had some eggs in the fridge which i had got for baking eggs, but used them for this.. I wanted to make bread omelette, ended up making just omelette.. my son enjoyed with lots of tomato sauce.. :)


Preparation time: 5 minutes
Cooking time: 3-4 minutes


Ingredients:

1. Eggs 2nos
2. Onions 1nos
3. Green chillies 2nos
4. Salt to taste
5. Oil


Method: 

1. Break the eggs and beat them well, add chopped onions, salt, green chillies and mix well.
2. Heat a tava, spread some oil over it.
3. Add in the egg mixture and spread it around rotating the tava.
4. Add a little more oil in the corners and let it cook.
5. Turn over and cook for a while.
6. Serve hot with tomato sauce/ketchup..


Brinjal (badanekeyi) gojju

There are a lot of people who don't like eating brinjals, especially the purple ones, since they think it sour, but when the gravy is made this way i guess many people can't even guess its brinjals.

Preparation time: 10 minutes
Cooking time: 20 minutes
Serves: 4

Ingredients: 

1. Purple brinjals 1/2kg
2. Onions 3-4
3. Green chillies 5-6
4. Curry leaves a few
5. Oil
6. Salt
7. Tamarind a lemon's size
8. Rasam powder 1 to 1.5tbsp
9. Coriander leaves a little
10. Grated coconut 1/4 cup
11. Water
12. Turmeric powder 1tsp
13. Mustard seeds 1tsp
14. Jaggery 2tbsp

Method: 

1. Wash the brinjals, and slit thiem into half. Cook them in pressure cooker up to 2 whistles and let the cooker cool.
2. In the meanwhile, chop onions and keep aside.
3. Heat oil in a kadhai and make seasoning of mustard seeds, green chillies and curry leaves.
4. Add onions, turmeric powder and saute till onions turn golden.
5. Now add the cooked brinjals, rasam powder (add the required quantity of rasam powder depending upon the hotness of the powder)
6. Add water if required and bring it to a boil. Add salt and mix well.
7. Now squeeze the juice of tamarind and mix well. Add jaggery and mix. Let it melt.
8. Cook for about 3-4 minutes.
9. Add grated coconut, garnish with coriander leaves and serve with chapathi/rice.


Bhindi (ladies finger) sambar

Bhindi (ladies finger) is a very popular veggie in India. very healthy as well. Its really good for everyone, kids, elders and especially diabetics.

My 3 year old has a vegetable rhymes dvd, in which this rhymes on ladies finger mentions "ladies finger, ladies finger slim and slender, soft and tender; ladies finger, ladies finger good for brain and memory power" very true i would say.. my little one loves ladies finger to the core..


This is a traditional sankethi style sambar, very tasty and will definitely tickle ur taste buds for sure..


Preparation time: 15 minutes
Cooking time: 25 minutes
Serves: 4

Ingredients:

1. Ladies finger (fresh) 1/2kg
2. Toor dal 1/2 cup
3. Oil
4. Dhania seeds 1.5tbsp
5. Grated fresh coconut 1/2 cup
6. Coriander leaves a little
7.Curry leaves a few
8. Salt
9. Water
10. Dry red chillies 8-10
11. Rice 1tbsp
12. Mustard seeds 1tsp
13. Tamarind about a lemon's size


Method: 

1. Cook toor dal and keep aside.
2. Wash the ladies finger, wipe them clean and cut them.
3. Heat oil in a kadhai and make seasoning of mustard seeds. Add the cut bhindi.
4. Fry/roast them well, stirring in between until the stickiness is gone.
5. Squeeze tamarind extract and the bhindi cook till tender. Add a little water.
6. Now grind coconut, dry red chillies, dhania seeds, rice and coriander leaves to a fine paste.
7. Add this to the cooked bhindi. Add toor dal, salt and boil for about 5 minutes.
8. Add water to required consistency.
9. Serve hot with rice/chapathi.


Tuesday, 5 March 2013

Shavige (vermicelli) upma

Shavige upma is a breakfast recipe when you've made everything else for breakfast all throughout the week. It can also be made as snack in the evening. You can vary the taste by adding veggies, or just onions. A lot of variations can be made with shavige, lemon masala shavige, puliogare masala shavige and shavige pulao as well.

Preparation time: 10 minutes
Cooking time: 15 minutes
Serves: 4

Ingredients: 

1. MTR roasted vermicelli 200gms
2. Onions 2nos
3. Green chillies 5-6
4. Tomatoes 2nos
5. Capsicum 2 nos
6. Oil
7. Mustard seeds 1tsp
8. Jeera seeds 1tsp
9. Curry leaves a few
10. Coriander leaves a little
11. Grated fresh coconut 1/4 cup
12. Turmeric powder 1tsp

Method: 

1. Chop the onions, capsicum and tomatoes. (you can use beans, carrots and peas as well, omit onions then)
2. Keep about 250ml of water for boiling.
3. If you're using the roasted vermicelli, you can start with the dish right away, but if you're using the regular one, you need to roast it till it turns light brown in 1tbsp og gheee/oil.
4. Heat oil in a kadhai and make seasoning of mustard seeds, jeera seeds, green chillies and curry leaves.
5. Add onions, turmeric and saute well till they turn golden brown.
6. Now add the capsicum and saute till they turn tender.
7. Add in the tomatoes, salt and mix well.
8. Next ass grated coconut and mix well. Simmer for about 2-3 minutes.
9. Slowly add the boiled water observing the need. You can add some more water later if required.
10. Cover the kadhai and cook for about 4-5 minutes on low flame.
11. Garnish with fresh coriander leaves. Serve hot.


Sunday, 3 March 2013

Pudina matar rice

Pudina (mint leaves), they smell heavenly and it does have a lot of medicinal values as well. They say raw pudina leaves when chewed early in the morning in an empty stomach helps in bringing the cholesterol level to a control.

I visit the local farmers market (raitara santhe) once in a fortnight to buy vegetables. I use it for about 15 days and they remain fresh even after that.. that's the advantage of straight from the farm i guess and on one such visit i got about 2 big bunches of pudina leaves.. so my menu was planned, pulao, pudina matar rice and pudina parantha. Once back home i removed all the leaves from the stem and stored them in newspaper and put them into the fridge.

Lunch box time and my hubby loves green peas, so does my son. So with menu planned in advance i had to make pudina matar rice. Very easy and hassle free..

Preparation time: 15 minutes.
Cooking time: 35-40 minutes
Serves: 4

Ingredients:

1. Rice 2 cups
2. Pudina leaves 1 bunch
3. Oil
4. Jeera seeds 1tsp
5. Onions 2nos
6. Garlic cloves 9-10
7. Tomatoes 1nos
8. Green chillies 9-10 (vary according to your taste)
9. Grated coconut 1/4 cup
10. Ginger paste 1tsp
11. Cinnamon stick 1 inch
12. Water
13. Salt to taste
14. Mustard seeds 1tsp


Method: 

1. Heat oil in a pressure cooker and add mustard seeds, jeera seeds, cinnamon stick, ginger paste and saute.
2. Grind the pudina leaves along with onion, tomato, garlic cloves, coconut and green chillies to a fine paste.
3. Add this fine paste to the pressure cooker and saute well and let it boil for about 2-3 minutes till raw smell disappears.
4. Add green peas, rice, water and salt. Mix gently and well so that the rice doesnt break.
5. Cover the cooker and cook for about 2 whistles.
6. Serve hot.


Heerekayi (ridge gourd) keepuli

This one's a superhit with our family, my hubby's granny who happens to be devarayasamudram iyer makes this dish to soo much perfection and sooo yummy that when made at home we store in the fridge for about 2-3 days and relish it along with rice, chapathi and dosa.

This is the recipe for the one made with heerekayi (ridge gourd), it can be made with greens as well (but make sure you dont use methi leaves).


Preparation time: 5 minutes
Cooking time: 20-25 minutes
Serves: 7

Ingredients:

1. Heerekayi (ridge gourd) 1 big
2. Grated fresh coconut 1/2 cup
3. Dry red chillies (byadagi and guntur) 5 each
4. Tamarind about a lemons size
5. Jaggery 2.5tbsp
6. Salt
7. Oil
8. Mustard seeds 1tsp
9. Jeera seeds 1tbsp

Method:

1. Wash the heerekayi and scrape its skin a little.
2. In a pressure cooker add the heerekayi, coconut, jeera seeds, tamarind and dry red chillies and cook it for upto 3 whistles.
3. Once the cooker is cooled, transfer the ingredients to a plate and let them cool.


4. Later grind them in a mixer to a fine paste.
5. Transfer to a cooking vessel and keep it on the stove on low flame.
6. let it boil for about 2-3 minutes. Add salt and jaggery at this stage, mix well and let it simmer.
7. Finally heat oil in a kadhai and make seasoning of mustard seeds and dry red chillies.
8. Serve hot with rice, chapathi or dosa.


Tooti fruity pineapple cake

My 3 year old loves cakes, whenever we pass through a bakery he says amma we'll buy cake.. So one fine afternoon when we were returning home from his school he again said the same words so i told him amma will make it at home and he instantly says i want tooti fruity cake (he had eaten it once in the same bakery that we crossed) and i answered ok..

Once back home i put him to sleep and started with baking the cake. I used pineapple essence rather than the usual vanilla essence this time.

Preparation time: 15 minutes
Cooking time: 25-30 minutes (depending on the oven)
Serves: 9-10 pieces

Ingredients: 

1. Maida/all purpose flour 1.5cups
2. Powdered sugar 2 cups
3. Eggs 3nos
4. Baking soda 1.5tbsp
5. Butter (melted) 3/4cup
6. Tooti fruity a little
7. Pineapple essence 1tsp


Method:

1. Preheat oven at 200 degrees.
2. Sieve maida and baking powder and keep aside.
3. Beat eggs (both white and yolk), add the pineapple essence and beat well till fluffy.
4. Now fold in butter and sugar and beat really well.
5. Slowly add the maida and tooti fruity and mix really well. More you beat, more fluffy the cake.
6. Grease the baking tray, pour the mixture and bake at 200 degrees for about 25-30 minutes, depending on the oven you use (you can check in between).
7. Once baked, remove from the oven, let it cool and turn around and cut as desired.


Onion and tomato chutney

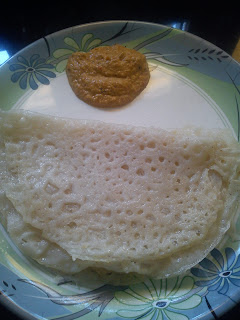
This chutney was an accompaniment with the Neer dosa i made. It had to spicy and a lilttle different from the regular coconut chutney, so i made this type of chutney. This can be served with regular dosa or even chapathi/rice as well, even idli's too.


Preparation time: 10 minutes
Cooking time: 3-4 minutes
Serves: 5-6


Ingredients: 

1. Onions 2 nos
2. Tomatoes 3-4 depending upon the size
3. Green chillies (spicier ones) 7-8 vary the quantity depending upon the spiciness you require
4. Jeera seeds 1tsp
5. Dhania seeds 1tsp
6. Curry leaves a few
7. Oil
8. Grated coconut 1/4 cup
9. Mustard seeds 1tsp
10. Water
12. Tamarind a little (if you're not using the sour tomatoes)

Method:

1. Heat 1tsp of oil in a kadhai and roast onions slit into halves till they turn light brown.
2. Add jeera seeds, dhania seeds and roast.
3. Now add in the tomatoes as well. Saute them for about 2-3 minutes.
4. Cool it and grind to a medium fine paste along with grated coconut, salt, tamarind (if you're not using the sour tomatoes)
5. Heat another teaspoon of oil in kadhai and make seasoning of mustard seeds and curry leaves.
6. Add the ground paste and saute for about 3-4 minutes (just for the flavour). You can omit this step if you want.
7. Serve the chutney with dosa, chapathi, idli or rice.


Neer dosa

Well the name Neer dosa is very popular, not only the name but even its taste... but making it some people think is really difficult but its quite easy.. all you need is the right consistency of the batter and most important thing, people at home to eat it quickly, as soon as its served...

I did my part of research before making it, and i wanted it to be right since it was the 1st time I would be attempting it.. I decided to make it over the weekend when my in laws came so that i could at least have people at home to enjoy with..

A few important points to note: There's absolutely no need to ferment this batter.. Some people say that dosa's needs to be made immediately after grinding, while some are of the view that it can be kept for about 30-45 minutes.. Some people according to their convenience make the batter and store it the fridge overnight.

One more point is about using the right kind of tava. I did borrow my mom's old tava (the one that people in Mangalore originally use to make such dosas) but my dosa never turned up using it, in fact the non-stick tava worked wonders for me.. All the dosas came out wonderfully without even sticking once.. But make sure the tava is not too hot (the dosa might turn crispy) nor too cold (dosa might not cook evenly). Maintain the flame venly once the tava is heated up..


Preparation time: 20 minutes
Cooking time: 3-5 minutes per each dosa
Serves: 5 (3 dosas each)

Ingredients: 

1. Raw rice (i took the rice i use daily at home) 3 cups
2. Fresh grated coconut 1/2 cup
3. Salt to taste
4. Water


Method:

1. Soak the rice for about 3-4 hours (i soaked it overnight coz i was making it for breakfast)
2. Grind the rice along with grated coconut to fine paste.
3. Add salt and adjust the consistency of the batter to very watery state.. It should be really watery unlike the normal dosa bater.


4. Heat the tava fully and pour about 1.5 spoon ful of the batter and rotate the tava with your hands, dont spread the batter with the spoon like its done for normal dosa.

5. Spread oil and cook with lid covered till its done on both sides.

6. Serve hot immediately with spicy coconut chutney or tomato chutney. I served with onion and tomato chutney


Thursday, 28 February 2013

Oreo milkshake

OREO... they claim it to be the world's number 1 biscuit.. it indeed is.. my 3.2 year old loves gulping them down anytime of the day.. he could even empty the entire pack if allowed.. I do restrict him to 2-3 in the evening after milk, but when my in laws or dad comes home he sneaks into the kitchen with them and has it whenever he feels like... so much so that i've started hiding them of late..

One fine evening i was just going through their page on Facebook and found this post about Oreo milkshake.. so i thought why don't i make it for him..


Preparation time: 2 minutes
Blending time: 3 minutes
Serves: 2


Ingredients: 

1. Oreo biscuits 3-4
2. Milk 200ml (1 glass)
3. Sugar 2tsp
4. Cocoa powder 1tsp
5. Ice cream (optional) i didnt use it coz i didnt have it at home..

Method: 

1. To milk break in the Oreo biscuits and add them.
2. Next add sugar, cocoa powder and blend them all well. (I used my hand blender, you can do it the regular mixer with a wet blade on)
3. Serve with Oreo broken into pieces or just like that.


In summer you can chill milk and make this or blend and then chill it..


Enjoy this delicious drink... it was soo delicious that i also could not stop myself from gulping it down... :)


Drumstick, Onion and potato sambar

I just love eating drumsticks, and when it blends with onions and potatoes.. the sambar smells and tastes soooo good...

My father in law loves this very much and so does my co sister and hubby's granny, so i could not avoid myself from sending some for them when my father in law went back home in the morning after staying with us for 3 days..

Preparation time: 10 minutes
Cooking time: 25 minutes
Serves: 5-6 people

Ingredients: 

1. Drum sticks 2 nos
2. Onions 3 nos
3. Potatoes 2 nos
4. Toor dal 1 cup
5. Fenugreek (methi seeds) 1/2tsp
6. Cinnamon stick 1 inch
7. Clove pods 2-3
8. Pepper corns 5-6
9. Dry red chillies 8-9
10. Chana dal 1tbsp
11. Urad dal 1/2tbsp
12. Dhania seeds 1tbsp
13. Tamarind about a lemons size
14. Salt
15. Ghee 1tbsp
16. Curry leaves
17. Oil 1tbsp
18. Mustard seeds 1tsp
19. Grated fresh coconut 1/2 cup


Method: 

1. Heat 1tbsp ghee and roast methi seeds, cinnamon stick, cloves, pepper corns, chana dal, urad dal and dhania seeds till light brown. Also roast the dry red chillies and let them cool. 

2. Cook toor dal, keep aside. Soak the tamarind in a little water and keep aside. 

3. Once cooled grind the roasted ingredients with coconut to a fine paste, add water while grinding. 

4. Add the ground paste and cooked toor dal to cooked vegetables and boil for about 6-7 minutes. 

5. Add salt and squeeze tamarind juice into the boiling sambar. 

6. Add curry leaves and simmer. 

7. Heat oil in kadhai and make seasoning with mustard seeds and serve hot with rice...


Tuesday, 26 February 2013

Palak dosa

Palak is a very nutritive green.. it has loads of benefits and its often advised to have green in your diet at least once a week.

When you run out of ideas to make breakfast everyday morning, try this new variant in Palak Dosa.. very tasty, healthy and i'm sure kids will love them (my 3 year old toddler did)

Preparation time: 20 minutes
Cooking time: 3-4 minutes per dosa


Ingredients:

1. Palak leaves 1 bunch
2. Rice 1/2kg (2 cups)
3. Salt
4. Oil
5. Dry red chillies 8-10
6. Tamarind a lemon's size
7. Dhania seeds 2-3tbsp
8. Jeera seeds 2tbsp
9. Coriander a little bit
10. jaggery (optional) 1tbsp
12. Grated fresh coconut 1/4 cup
13. Water
14. Onion 1nos

Method:

1. Soak the rice for about 3-4 hours.
2. Grind the rice along with jeera, dhania seeds, coconut, tamarind, coriander leaves, dry red chillies, onion  and jaggery to a paste to dosa batter consistency.
3. Wash the palak leaves and chop them as finely as possible.
4. Add it to the batter and mix well. Add salt also.
5. Mix well. Add water if required.
6. Heat tava and pour the batter evenly and cook on both sides.
7. Serve hot with ghee and coconut chutney/chutney powder.. (You can eat it just like tht)..


Veggie (cabbage and carrot) parantha

Want ur kid to eat up the veggies... here's a tasty and simple way to do it, healthy as well... All mom wud be very happy i'm sure to see the sight when a toddler finishes up his lunch without any fuss..


Preparation time: 15 minutes
Cooking time: depends on the number of paranthas ur making..


Ingredients:

1. veggies (1/2 small cabbage and 2 carrots) finely chopped.. you can use any other vegetables of ur choice
2. Wheat flour 2 cups
3. Water
4. Oil
5. Salt
6. Ghee
7. red chilli powder 1 tsp
8. Garam masala (optional) 1 tsp
9. Jeera powder 1tsp
10. Turmeric powder 1tsp

Method:

1. Heat about 1tbsp of oil and saute the veggies till raw smell disappears. Let it cool.
2. Once cooled mix this to the wheat flour and make a dough similar to chapathi dough.


3. Now make balls from the dough and roll them and spread a little oil and fold in this manner..


4. Now roll it into thick paranthas this way and cook on tava with a litlle more oil or ghee..


Monday, 25 February 2013

pizaaa ma ma miaaa

Well after i bought an OTG, 1st thing i baked was Cookies, which was my last post and after that i wanted to make Pizza's.. well researched the internet on methods, followed bits and pieces from a lot of blogs and of course took help from my friend who has an OTG and her hubby does bake yummy cakes and breads in them.. Well there was nothing more to stop me from making a pizza, but my hubby was out in The US of A from office and it was just me and my 3 year old son at home to enjoy it.. guess what both of us had a pizza party.. he loved every bit of it.. of course with lots of tomato sauce...

My previous efforts to make pizza on the tava and in the grill microwave weren't so successful, but that didn't deter me from making them..

Preparation time: 15 min
Cooking time: 12-15 minutes (depending upon the oven)
Serves: 1 (small base)

Ingredients:

1. Pizza base 1 nos.
2. Vegetables finely chopped of your choice (i used tomatoes, capsicum, cabbage and carrot)
3. Pizza sauce available readily in stores


4. Pizza cheese (i used Britannia, Amul is also good)
5. Tomato sauce

Method:

1. Preheat the oven at 220 degrees for about 5-7 min
2. Spread the pizza sauce over the base evenly


3. Heat oil in a kadhai and saute the veggies (optinal).. you can omit this step and just spread it evenly.

4. Grate the cheese (as much as you require).


5. Bake at 220 degrees for 12-15 minutes (till cheese melts and the base turns light brown)


6. Cut them .. and enjoyy with tomato sauce/ketchup.


Saturday, 16 February 2013

Cookiessss

After a lot of yes and no and lot of research on the internet i finally bought an OTG (Oven, toaster and griller) from Prestige... And the love of baking made me buy it, my hubby was a little against it in the beginning since he thought its of not much use and since i was already using my mom's round oven he thought it would not be right to have 2 of them in the kitchen.. i had to convince him (it was easy though)..


So i was all excited to bake... and i decided let me start with cookies/biscuits 1st.. and also i had bought cookie cutters recently so there began the experimentation..

Preparation time: 15 minutes
Baking time: 20-25 minutes (depending upon the oven)
Yield: About 35-40

Ingredients: 

1. Maida 1.5 cups
2. Sugar (powdered) 2 cups
3. Pineapple/vanilla essence 1tsp
4. Baking powder 1.5tsp
5. Butter 100gms
6. Milk if required

Method: 

1. Sieve the maida and baking powder and keep aside.
2. Mix butter and sugar and beat till light and fluffy.
3. Add vanilla/pineapple essence to the mixture.
4. Now slowly add in the maida mixture and knead it to a dough.
5. Add milk while making dough if you find it too dry.
6. Now roll the dough into 1/4" thickness.
7. Using a cookie cutter cut them into shapes and arrange them on a greased baking tray.


9. Bake them at 175 degrees for about 10-15 minutes or till they turn light brown, depending upon the oven.

10. Let them cool and they're ready to serve..


the finished product


Monday, 28 January 2013

Masalaaa papad

Who would not have had a masala papad as an accompaniment with soups at Indian restaurants, especially in Bangalore.. its a really famous starter.. Its really very easy to make and i bet it'll be popular evening snack as well, especially in the rains..

Preparation time: 10 minutes
Cooking time: 10 minutes
Serves: 5 (2 papads each)

Ingredients:

1. Masala papad (store bought) 1 packet
2. Onions finely chopped 3-4
3. Tomatoes 3-4
4. Lemon juice a little
5. Carrots grated (optional) 2
6. Salt
7. Red chilli powder


Method:

1. Roast the papad's in a microwave (at high power for abt 20-25 secs). You can roast them directly on flame as well.
2. Mix the finely chopped onions, tomatoes and grated carrots along with salt and red chilli powder.
3. When ready to be served spread the mix over the papad, add lemon juice and serve.


Potato and cauliflower pulao

Pulao is always made of veggies like beans, carrots, potatoes, peas etc... and the day before i just bought a cauliflower for the 1st time... yes for the 1st time i bought a cauliflower... i had just heard about others cook with it but i personally had never cooked it at home... so me and my hubby thought y not try it... and moreover i had planned for a moonlight dinner (beladingala oota) on sunday when my in laws, brother in law and co sis wud join us for dinner so i had to make something different... So i was just browsing thru the net for some rice based recipes with cauliflower and found one such on Tarla Dalal's website..


Preparation time: 20 minutes
Cooking time: 30 minutes
Serves: 7

Ingredients:

1. Cauliflower 1 whole (about 1kg)
2. Potatoes 5-6
3. Onions 3-4
4. Cinnamon stick an inch
5. Clove pods 3-4
6. Oil
7. Ghee
8. Rice 1.5 cups
9. Salt
10. Water
11. Bay leaf 1 leaf
12. Coconut milk/ coconut milk powder
13. Green chillies 6-7
14. Red chiili powder 1/2tsp
15. Turmeric powder 1tsp
16. Garam masala powder, dhania powder, jeera powder, amchur podwer 1tsp each
17. Mustard seeds 1tsp
18. Ginger garlic paste 1tbsp


Method:

1. The most important thing is to wash clean the cauliflowers and put them in boiling water along with some salt and turmeric.. Let them settle for about 15-20 mins. Once done wash them again thoroughly with cold water and keep aside.
2. Heat oil and ghee in a pressure cooker, make seasoning of mustard seeds and add ginger garlic paste, bay leaf, cinnamon stick, clove pods and onions to it, saute well.
3. Add turmeric powder and red chilli powder and mix well.
4. Next add the garam masala, dhania, jeera and amchur powder and mix well.
5. Make a paste of the green chillies and add them as well.
6. Now let it cook till rawness is gone.
7. Now add in the potatoes cut into cubes, then cauliflower and mix them well.
8. Now add the coconut milk/coconut milk powder (use as per directions) and mix well.
9. Add rice, salt along with water and give it a nice slow mix..
10. Cover the lid and cook for 2 whistles.
11. Serve hot with tomato and onion raitha.


Monday, 21 January 2013

Microwave 5 minute brownie

Hogging on some yummy brownies is something i always love.. But the fact that i didnt have a proper oven to bake the perfect one.. But one such foodie social website provided me an idea that i can even bake it in a microwave oven and that too in 5 minutes flat..

Preparation time: 3 minutes
Cooking time: 2 minutes
Serves: 1


Ingredients:
1. Oven proof coffee mug
2. All purpose flour/maida 2 tbsp
3. Sugar 2tbsp
4. Oil/butter 2tbsp
5.Cocoa powder 1 tbsp
6. Water/milk 3tbsp

Method:

1. In the coffee mug first mix the flour, sugar and cocoa powder well.
2. Next add oil/butter, water and mix well.


3. Put it into the oven at high power for 1 min and 40 sec or till its baked..

Enjoy it just like that or with a dollop of vanilla ice cream.. slurrrppp..


Sweet potato parantha

Sweet potatoes are available a lot during sankranthi and after making a dish out of sweet potato there was some leftover for the next day so i decided to stuff it in and make paranthas... My 3 year old just loved the sweet taste of the paranthas and gobbled 2 full paranthas..


Preparation time: 10 minutes (only for mixing the dough)


Ingredients:

1. Sweet potatoes 2-3
2. Green chillies 5-6
3. Fresh grated coconut 1/4 cup
4. Salt to taste
5. Atta (wheat flour) 3 cups
6. Oil
7. Water
8. Mustard seeds 1tsp

Method:

1. Start off by cooking the sweet potatoes (whole) in a pressure cooker. Once cooled peel off the skin and mash them.
2. Make a seasoning of mustard seeds, green chillies and mix in the mashed sweet potatoes and salt along with fresh grated coconut.
3. Make a dough for chapathi.
4. Make balls as usual and stuff the sweet potato mixture to and roll them.
5. Cook on a heated tawa and serve hot.


Thursday, 10 January 2013

Brinjal, potato and hithkida avarekalu hulithovve

This my 101st post and it had to be something unique, and after a brief spell of disappearance i want to give you foodies an absolute delight and something not made at all households. My mother in law's special recipe and it definitely is my hubby's as well. And i'm very much sure that most of you will also love it. 

Hithkida avarekalu can be made my soaking avarekalu in water for about 7-8 hours and then removing their skin from the seeds. You can sprout this as well.

Preparation time: 15 minutes
Cooking time: 25 minutes
Serves: 4

Ingredients:

1. Hithkida avarekalu 200gms
2. White brinjals 3-4nos
3. Potatoes 2-3nos
4. Toor dal 1 cup
5. Bisi bele bhath powder 3-4tsp
6. Oil 2tsp
7. Mustard seeds 1tsp
8. Salt
9. Tamarind a lemon size
10. Curry leaves a few
11. Water
12. Fresh grated coconut 1/4 cup
13. Dry coconut 1/4 cup


Method:

1. Cook the avarekalu along with potatoes and toor dal in a pressure cooker.
2. Slit the brinjals lengthwise and cook them as well.
3. Once done mix both in a vessel and add 3tsp's of bisi bele bhath powder and salt to taste and cook them till raw smell of the powder is gone.
4. Now squeeze the tamarind pulp and cook for 2-3 minutes.
5. Grind the fresh and dry coconut along with 1tsp of bisi bele bhath powder. Add the grind paste to the gravy.
6. Let it simmer for about 4-5 minutes.
7. Heat oil and make seasoning of mustard seeds and curry leaves.
8. Serve hot with chapathi, dosa or even rice.


Palak avarekalu gravy

Like i mentioned in my earlier post avarekalu becomes a form of staple food in Karnataka households during the months of December to February, various dishes are prepared from the kalu almost on a daily basis.
Here's one of my trials based on my hubby's recommendation after he had eaten something similar in his office cafeteria.

Preparation time: 10 minutes
Cooking time: 20 mins
Serves: 4

Ingredients:

1. Palak 2 bunches
2. Avarekalu 250gms
3. Onions 3 nos
4. Tomatoes 2 nos
5. Cinnamon stick about an inch
6. Green chillies 7-8
7. Salt
8. Oil 2tsp
9. Jeera seeds 1tsp
10. Garlic 5-6 pieces
11. Fresh cream 1tbsp (optional)

Method:

1. Wash the palak leaves thoroughly and cut them into half.
2. Now cook the palak leaves, onions cut into half, tomatoes cut into halves as well along with cinnamon stick, green chillies and garlic.
3. In the meanwhile, cook the avarekalu with a little salt till tender.
4. Once the palak is cooked, shift them into a big plate and let it cool.
5. Now grind all the ingredients together to a smooth paste.
6. Heat oil in a kadhai and make seasoning of jeera seeds.
7. Add the ground paste and cooked avarekalu and mix well.
8. Add salt and blend well.
9. Garnish with fresh cream (optional) and serve hot with poori/chapathi.


Wednesday, 9 January 2013

Macaroni and maggi jugalbandi

Well the story behind this dish is actually my hubby was in a mood to eat macaroni, but i had only abt 200gms of it left at home so it was he who suggested i add maggi to it and make something.. 

Preparation time: 15 minutes
Cooking time: 25 minutes
Serves: 3


Ingredients: 

1. About 200-250gms of mtr macar
oni
2. 2 cakes of maggi noodles
3. Tomatoes 3-4
4. Onions 2 finely chopped
5. Tomato sauce, chilli sauce
6. Salt
7. Red chilli powder
8. Butter/oil 


Method

1. Cook the macaroni as per directions on pack; follow the same for maggi noodles as well. 

2. Heat butter/oil in a kadhai and add onions, saute them until golden brown. 
3. Add red chilli powder, the maggi masala powder and mix well. 
4. Add tomatoes, salt and cook until tomatoes turn tender and mash them well. 
5. Now add the tomato and chilli sauce (You can add sweet and hot sauce as well if u have it)
6. Mix in the cooked macaroni and maggi noodles. Give a nice stir and cover and cook for about 3-4 minutes. 
7. Serve hot..


Avarekalina usli

After a short disappearance I can announce by coming back with this short, quick and yet yummy recipe.
Avarekayi (Flat beans) is very popular in Karnataka and is used in almost all households during the months of December to February. More so during January, during Sankranthi/Pongal.


Preparation time: 5 minutes
Cooking time: 20 minutes
Serves: 4


Ingredients:

1. Avarekalu 500gms
2. Green chillies 7-8
3. Mustard seeds 1tsp
4. Hing a pinch
5. Oil
6. Salt
7. Fresh grated coconut 1/4 cup


Recipe:

1. Pressure cook the avarekalu upto 2 whistles.
2. Now heat oil in a kadhai and make seasoning of hing, mustard seeds and green chillies.
3. Add the cooked avarekalu and mix well.
4. Add salt. coconut and give it a nice mix.
5. Serve hot with chapathi, rice or just as an evening snack.

Variation: You can also add coarsely ground garlic (omit hing if using garlic).